Life is a bit hectic this summer, and I'm not finding much time to blog right now. I'm not sewing much either, and my knitting is progressing so slowly that I don't have much to talk about. Rather than try to blog and just not getting around to it each week I'm taking a break for the time being.
But I'll leave you with something I did sew, even if it's from a long time ago. I made this dress for my niece Madison when she was about 18-20 months old. According to the pattern it was the right size. But she was able to wear it for the first time when I saw her at my mother's house 2 weeks ago, now that she is going to be 5 in a few months. She is quite small for her age, but I think that the pattern was a bit off, too!
The fabric is a print of vintage little girl paper dolls and dresses and is perfect for Madi. She's at the age where everything must be pink (or purple if need be). It's a cotton print I bought at Poppy Fabrics, which is a clue as to how long ago I made this. I added a few vintage buttons at the front neck, and it's as cute as can be on her.
Hope everbody has a great summer, and I'll talk to you again in the near future.
Saturday, July 10, 2010
Sunday, June 20, 2010
Not much going on.
I know this makes for a very boring post, but I've not made much progress on either of my knitting projects, haven't sewn anything, or done anything else of a creative nature.
I'm still finding that I am pretty much out of energy by the end of the work week and a 2-day weekend isn't nearly enough to fully recharge my batteries. So, I'm not doing as much knitting as I used to. But I'm looking forward to getting back into the swing of things as time goes by.
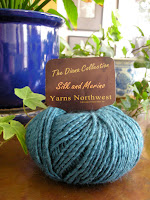
In lieu of anything more exciting to talk about, I will leave you with photos of the yarn I purchased while on vacation. The teal is for me, and the charcoal tweed is for TW. He wanted a vest with some detail on it, like a small cable around a v-neck and down the fronts and the wool tweed will be perfect for him. Not sure yet what the teal wool/silk will be, but as I only have 7 balls it will probably be some sort of vest-like thing as well. TBD later!
Sunday, June 6, 2010
A great trip.
Our trip to Montana was wonderful! In spite of driving through rain, hail, and snow on the drive there we had good weather while actually in the Glacier National Park vicinity. Montana is a beautiful state and we definitely will want to go back sometime.
My planned knitting project was perfect for the trip. It was simple enough to not need undue attention and the yarn has been a real treat to knit on. I neglected to take pictures while actually on the trip, but I've been using it as my ferry commute knitting and have made good progress since getting home.
To make the knitting more interesting and to eliminate any seams in this very textured yarn I decided to knit the vest from the shoulders down to the hem all in one piece. This will allow me to adjust the fit as well as to avoid seams. The white bits in the photo are from the provisional crocheted cast-on, where I started each shoulder separately and knit down to the armholes. Once the two fronts and the back were done they were all joined together into one piece for the body. I'm increasing a bit at the side "seams" (where the orange markers are) and increasing every other right-side row to create the wedge shaped center fronts.
While in Montana I stopped in Knits 'n Needles, the local yarn shop in Whitefish, the town where our hotel was. What a terrific little shop! Lots of charm, lots of great yarns, and a very friendly and helpful owner, Aimee. She had good sample garments scattered around, as well, which I can now prove to be a huge help in selling yarn. As I was poking around, Thomas spotted a sample child's vest made from a soft wool tweed (Berocco's Blackstone Tweed) and immediately asked me if I could make him a new vest suing this yarn. He's never looked at any yarn by itself and visualized what he might want from it, but seeing it already knitted up into a garment similar to what he'd want made all the difference. He picked out a beautiful deep charcoal grey colour with an almost purple undertone and tan, rust, and light grey flecks. I found for myself a beautiful deep teal silk and wool blend that glows like a jewel. It's from a yarn company I hadn't heard of before called Yarns Northwest. I really love souvenir yarn, and this time we got his and hers yarns!
Sunday, May 16, 2010
Just getting started
Considering that I'm quite eager to get some new projects underway, I'm going about it in a rather lackadaisical manner. I've been diddling with yarn and needles for these two projects for some time and while progress is discernible it's on the subtle side, shall we say.
The first project is Sandrine by Bonnie Marie Burns of Chic Knits. It's a pullover sweater with a pretty wrap bodice in a rib stitch, and a plain lower body. I'm using a bamboo/cotton blend yarn in a deim blue from elan.com called Bamboo Fusion. I like the contrast between the shiny bamboo strands and the matte cotton ones, but the yarn splits like crazy and so I eliminated all of the possible uses that included complex stitch work such a lace or cables. Simple ribbing and stockinette stitch I can handle so Sandrine is turning out to be a good choice for this yarn.
Sandrine is knit from the top down without any seams, which I really enjoyed while making my Spring Peasy so will try the technique again, this time in the round as there is no center front opening. The pattern also includes a wrap cardigan view which looks very nice in photos I've seen of it. So far, I've managed to get a gauge swatch done and the cast-on plus 2 rows of the neckline. Not much but at least it's now on the needles.
Secondly, I'm trying out some ideas for a project to take on vacation next week. For me, vacation knitting should be easy, uncomplicated, big enough to last for the trip without being too big to fit into a suitcase, and enjoyable to work on. At Stitches West last March I bought a couple of skeins of this wonderful silk/wool blend with an interesting thick/thin texture. It's called Ellie from Brooks Farm Fiber. The yarn changes very dramatically in diameter from very thin to really thick but overall works up at about a worsted weight gauge or a little bigger. The fabric alternates between very airy and light and quite dense. The colour isn't good in either photo; it's actually a vibrant deep blue/violet.
I had intended to make a vest out of it and have been searching for some time for the shape and style I wanted. After a lot of perusing of my knitting books and magazines I finally found the right combination of simple but interesting styling and yarn requirements in Vogue Knitting's spring/summer 2009 issue. It's style #11 and if all you look at is the photo you might never look twice. The neckline of the garment is edged with a very fluffy feather boa that hides everything in it's path, and in true Vogue Knitting form, the model is clutching the front of the garment with her had so there's no possible way to tell what this thing actually looks like. Only by looking at the line drawing could I see there was a very nice vest lurking under all the frou-frou.
The front pieces of the vest are shaped almost in a wedge form at the front edge and fall in folds from the neckline. In Vogue's version the wedges are sewn together along the center front line to make the vest more of a pullover tunic. I don't know if I'll do that or just let the fronts hang; it will have to wait until I'm done. I'm still tweaking withe the gauge to get it right. The vest is so simple that it's easily adjusted if my gauge is off but I want to like how the fabric looks.
So I will be off to Glacier National Park on my annual road trip with TW. I'll definitely not be blogging next week and may not the next one either, but I'll be back in June for sure. See you then!
Sunday, May 9, 2010
Springing forward
Given the blustery, showery weather today it seems more like February than May, but it's still spring in my mind no matter what the weather. So I have finally finished my first sweater project for the season. While it's quite a simple pattern it took a very (for me) long time to complete; I've been working on it sinch early March. No particular reason for the long time; I just didn't work on it as furiously as I usually work on my knitting projects. I've needed to slow down a bit as of late so it just means everything takes a little longer than it used to. But it's done, I've worn it, and I love it.
The pattern is called Peasy (I assume because its easy-peasy to make). The little vine lace at the neck is very simple - an 8-stitch repeat over 4 rows - and is a nice touch on a simple shape. I changed the sleeves slightly by adding more of the lace at the hems. It's the first top-down, all in one piece sweater I've ever made. This technique is nice because you can try on the sweater as you go, and now before you're done that it really fits. Always good knowledge to have!
I used 6 balls of Silky Wool yarn colour #9 Verdigris. I've made at least 4 sweaters from this yarn in various colours and will happily use it again. With 50% wool and 50% raw silk it's light, soft, and gently warm without being too heavy and bulky. As I bought this yarn on my Christmas trip to Mendocino with Thomas it counts as both special occassion and souvenier yarn so it's extra special. :-)
Speaking of special, aren't the buttons beautiful? They're vintage buttons of unknown age that I've had for many years, and they were perfect with the yarn. If it's not clear from the picture they contain a little scene of a bluebird feeding a baby bird in it's nest on the branch of a tree. I'm so glad to fianlly have found a good use for them.
Sunday, May 2, 2010
Hats continued.....
I finished another of the Piper hats for a Sew Group friend; this one for Judy L. I've made a bizillion of these hats by now,and this one really takes the cake. Judy's choice of colours was great, and the sunflower ornament is fantastic. It will get mailed to her this week, and I'm pretty confident that she'll love it.
For the knitters out there, here are the details:
Pattern: Piper from Twist Collective
Yarn: Summer Tweed from Rowan (cotton/silk blend)
Sunflower: purchased at Knitterly; it's by a company called Grayson that makes leather purse handles and other hardware for handbags (sorry; couldn't find a link for this one)
Sunday, April 25, 2010
Spring clothes
As it finally feels like spring is here some spring sewing is in order. I few years ago I had a wonderful linen tee shirt and linen vest combo that I half lived in during the warm seasons and wanted to revive the idea for this year.
I had a head start with a long sleeved linen top I made last year out of a window pane checked linen from my stash, using Textile Studio's Marseilles Shirt. To complete the look I made a vest using Simplicity 2539.
The pattern has been on my to-make list for some time but got a real push when I saw the version made by my friend Ellen at Sew Group's annual retreat to Bodega Bay. She'd made some major mods to the back but I was able to try it on and get a sense of the look and size. We agreed that it ran on the small side so that was helpful to know in advance.
Also at Bodega Bay, Lynn gave me some very large scraps of a gorgeous deep blue-violet linen left over from a project she had started. With a little fiddling and some creative choices of grain lines here and there I was able to squeeze the vest out of the linen pieces much to my delight.
I didn't need to make many changes in the vest pattern. I cut a size 12 for the neck/armholes and tapered out to a 14 fro the rest and didn't need to adjust a thing. The pattern already has a center back seam so I just curved it in toward the neck a small amount. Darts are built into the curved front seams (the pockets are also set into this seam) so I didn't add anything there. The length was good too.
The whole ensemble looks a bit baggy on Jezebel, my lovely vintage mannequin, but as she has a figure that would make a Barbie doll feel large it's not to be wondered at. I am very, very happy with the finished vest and the overall look over the linen top. I'll definitely make more of both pieces for the summer.
Sunday, April 18, 2010
A Banner Day
TW and I have been collaborating on a fun project - we're making 4 banners for the California College of the Arts to use in their Commencement ceremony in early May. We're both alumni, as well as TW being a professor there, so it makes for a special project for both of us.
There's one banner for each school within the College - Fine Arts; Design; Architecture; and Humanities & Sciences. They'll hang from an "L" shaped pole and will be carried in front of the groups of graduating seniors from each of the schools in the Commencement procession.
Plain fabric is being screen printed by TW, and then sewn into the banners by me. We found a drapery lining fabric that's coated on one side with a lightweight insulation layer that makes a surprisingly perfect choice for the project. It's sews easily, but it's quite opaque and has a nice drape to it. The bottom hem of each banner will have gold fringe across it to give some extra weight to them, and grommets along one side will be used to attache the banner to the vertical pole to keep it from swaying too much.
We did a bunch of scribbling and figuring; it took some time to figure out what sort of poles we would make and how the banners would hang from the poles, etc. (We're doing the fabrication for that part, too.)
Once we had the design and the materials, TW cut the panels and printed them, first with the seal of the College in gold, and then with black for the lettering. Meanwhile, I made a life-size sample banner to work out the construction kinks.
As of tonight we've gotten all the printing done and the sample banner is done. TW will get the poles from an aluminium supply tomorrow and get them assembled and painted over the next week, and I'll do the actual banner sewing next weekend. It's great fun to collaborate with my sweetheart!
Sunday, April 11, 2010
Good friends
Today was a great day spent with good friends. Patricia hosted an afternoon of sewing, knitting, and whatever else we wished to bring along, and for me, offered an opportunity to hand deliver hats I had knitted for Michelle and Lynn ( I had made one for Patricia earlier). So here we are! For some odd reason it hadn't occurred to me to bring my own hat so the hatmaker is the hatless one here.
The pattern is called Piper, and is from the Fall 2009 issue of Twist Collective, an online knitting magazine. If you haven't looked at it before I do recommend it. The patterns are available by purchase for download and feature a wide range of current knitwear designers. By being available for purchase pattern by pattern the designers earn more from their designs than if they were published in a print magazine.
Today's hat recipients chose their own yarns while on our Sewing Group trip to Bodega Bay in March. We stopped in Petaluma for a visit to Knitterly to give everyone a chance to pick their preferred colours and textures.
For her hat, Michelle chose Rowan Yarns "Calmer" for the main colour, and a deep purple-grey chenille called "Touch Me" from Muench Yarns for the trim, and a gorgeous vintage looking button in black and a touch of gold.
Lynn chose two Rowan Yarns for her hat; "Summer Tweed" in a brilliant turquoise with yellow and pink flecks, with LenPur in a solid turquoise for the trim. Her button was a large, contemporary ceramic button with mutlicolour stripes.
What I love about this hat is that every time I make it, always in a different mix of yarns, it always looks different, and always looks great on the wearer. This is a real winner of a knitting pattern, and is easy and fun to knit to boot.
Kathy was also at today's get-together, not being a hat person, chose to remain hatless. She worked hard at cross-stitching this afternoon. Patricia made a wonderful lunch of grilled cheese sandwiches and tomato soup, Kathy and Margaret brought delicious salads, and 2nd Kathy brought tzatziki and pita bread (I can still taste the garlic!) and Lynn and I brought desserts. No one went hungry, needless to say. Except Freya, Patricia's German Shepherd.
Sunday, April 4, 2010
Back at it again.
Wow, it's been a while! I've been dealing with a serious illness over the past year but am now feeling better and am excited to be posting again. It's good to be back.
I'm planning on expanding my blogging to include more than knitting to include a wider range of my creative endeavors of all sorts; mostly, but not exclusively, focusing on textiles. So my first post is about a project that is combines crochet and sewing, old and new, past and present.
My great-Aunt Jessie was an avid crocheter and churned out acres of lace tablecloths, ruffled doilies, kleenex covers, and what have you in her long life. I treasure the crochet pattern book, published in 1942, which she left to me and that included her beloved pineapple-patterned round lace tablecloth.
My mother and I both have a number of pieces of her beautiful lace crochet, and mom recently gave me this cotton crochet tote bag that Jessie had made to see if I would use it. It had been lined it with some beige twill cotton, and was stiffened in the bottom with a piece of Masonite. The thing weighed a ton and was a bit on the dull side, but the crochet was in excellent condition and had plenty of potential to be made into something more chic.
So I rummaged through my stash of fabrics and notions and found some black wood oval purse handles and some solid black cotton. Hmm, here's a good start. What if I backed the crochet with the black cotton to really set off the lace and replaced the crochted handles with the black wooden ones? A good start.
But a black lined bag is impossible to find things in, especially once they fall to the bottom of the bag, so back to the stash I went and found an ivory and black cotton print that had the right blend of contemporary chic and old-fashioned charm. Now we're talking!
So using the old beige lining as a pattern, I made a whole new tote bag of solid black on the outside, the print of the inside, along with a handy zippered pocket. I stiffened the whole thing with some scraps of primed artist's canvas that where lying around the studio, using a double layer in the botton to keep it flat and sturdy. Loops of the solid black attached the handles.
Once everything was constructed I slipped the crochet over the outside of the bag and stitched it around the top. Voila! A beautiful new bag that both honors my aunt's skills and suits my own sense of style.
Subscribe to:
Posts (Atom)